Blog Layout
How to Build a Workbench from Dimensional Lumber
Jun 06, 2018
I’ve been in need of a proper workbench for my woodworking for awhile now. I was without a shop for awhile so making one was a bit pointless at that time. Now that my roommate and I have found this house with a building very suitable to be a shop, the time to build a workbench was long over due. The shop, while not really small, is still limiting when it come to space for woodworking tools. So my bench has to be of a size that gives me room to work on it and still leave room for me to move my Shopsmith Mark 5 around and adjust it as needed for whichever way I need to set it up. I also wanted it to be large enough for me to be able to work on larger projects like tables and other furniture projects.
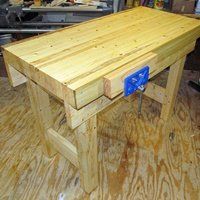
The original plan was for it to be 4 feet by 2 1/2 feet, but that was adjusted a bit as the build proceeded. The final dimensions of the top are 46 1/2 inches by 22 1/2 inches, and the hight of the workbench is 30 7/8 inches. One of the 2x4‘s I was going to glue up into the top twisted to a point that it was just not worth trying to square up. After seeing the size it would be I decided not to add another, and it worked out fine, and the top came out to a good size for what I needed. So on to the how I did it part.
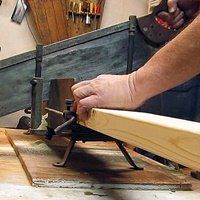
how to build a workb...First I took 6 pieces of 8 foot 2x4 SPF and cut them in half. Then I used my hand planes to get the sides of the 2x4‘s I would be laminating flat so they would glue up without any gaps. Then of course there was the glue up. I was limited on clamps so I did this in stages over several days. In fact. I’d plane two boards and glue them up and get them clamped. Then while they dried, I used the wood plane to flatten the next two. The next day I repeated the process and continued until I had 6 pieces of 2x4 glued up. Then I glued up those 6 pieces of SPF, two at a time until got to the final glue up in which I used the wooden wedge clamps I had made awhile back because they are the only clamps I have that were long enough to work. The wedge clamps work as well as any so I don’t feel the need to stress finding the money to replace them with pipe clams or other expensive alternatives. I just have to be sure I use something to keep them form being glued to the project. Being made from wood, they could easily become attached to what I may be gluing at the time.
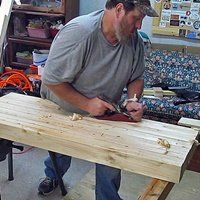
Then after the top was all glued up and dry, I took the hand plane to the bottom of the top. (Does that even make sense?). I mean, the bottom side of the top. The main purpose here is to get the area that the legs will attach to flat and reasonably square. This will help keep the workbench from having any wobble in it that would mean having to trim and level the legs. I cleaned up the entire bottom but I really only stressed the area that the legs would attach to being completely flat and square. The ends of the workbench top were a bit raggedy and not flush where the 2x4's were glued, so I cut a thin piece off each end of the top to square that up. I also ran the bench plane over the ends just to smooth the roughness from the saw cut.
Then I began working on the legs. The legs are made up of two 2x4‘s which I glued together to form 4x4 boards, which I then planned to be reasonably square and cut 4 legs from that. I cut each leg at 29 inches. (After the legs sections are joined, a 2x4 will be screwed across the top of each leg section increasing the height of the legs by 1 1/2 inches. **in the U.S.A., 2x4‘s are usually, in reality 1 1/2“ x 3 1/2“**). After the top was added and flattened, I ended up with a working height of 30 and 7/8 inches.
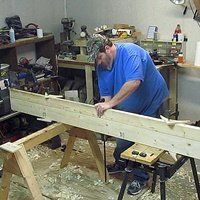
how to build a workb...I went ahead and glued up the boards I’d be using to make the apron so it could be drying while I finished working on the legs. The apron is a 8 foot 2x6 spf board, with a 8 foot 2x4 glued on top of it. And of course I planned squared and made sure the surfaces to be glued were flat before I glued and clamped them. I don’t mind telling you that taking a wood plane to a 8 foot board in a small shop is a challenge. Then I decided on where the cross-braces for the legs would be going and marked all the way around the legs for the width and height of the cross-braces and marked for my mortise. And took mallet and chisel in hand and began to make my mortises. How I did that and everything else is in the video playlist on that is linked below.
After I got the mortise done, I cut the cross-braces. I cut them a little longer then they would end up being. This being a through mortise and tenon, I wanted to be sure the tenons went all the way through. I will cut off the excess with a flush-cut saw after the glue up. I marked and cut the tenons, being sure to cut to the waste side of the line and paired down with a chisel and plane until I got a snug fit in the mortise. Then after all mortise and tenon were cut, I glued them up. When that dried I added the 2x4 board across the top. The next step I did to the legs was to add some dowels through the mortise and tenon joint. This really isn’t a must do, but it added to the strength of the joint so I did.
Next came the apron. I squared up the ends with a hand saw, then cut to length. Used a handplane to flatten and square. Then I cut some wedges out of a scrap piece of wood to use to wedge the apron to the leg braces. Then marked for the recesses to place the legs and wedge in the apron. I screwed up on this part. The basics of my workbench is based on Paul Sellers’ workbench. The wedges are supposed to be pointed down to allow gravity to always work the wedge to work it’s way back down tight in case they do loosen. The correct way to do it can be found in this video by Paul Sellers. https://www.youtube.com/watch?v=06si-zVX8FA&feature=youtu.be
I had to use wood screws to reenforce the wedges in the legs. How I did that and straightened out my screwup is in my video series.
The rest of it is just getting the legs set in the recesses of the apron, adding the wedges. Then place the top between the apron pieces and attaching with screws. And of course adding the woodworking vise. All of that is shown in the playlist I have embedded below. Also, as I mentioned, the basics of this workbench build are based on Paul Sellers’ build series, How to Make a Workbench. If you don’t know who Paul Sellers is, you have been missing out. He has many years of experience making fine furniture and woodworking. And shares so much of his knowledge. Please check his channel and blog out.
And here is the video playlist of how I built my workbench. Mistakes were made, but the true talent in anything is figuring out how to fix the mistakes. I hope you enjoy it. https://www.youtube.com/watch?v=WCLBqwIkP6A&list=PLdwx77PpBsOU766avjeImIp1Gxika_qTL
Redneck Know How Blog

Will the HYCHIKA cordless screwdriver help me get the screws screwed when my arthritis is acting up? Sometimes it's painful to keep twisting a manual screwdriver and hopefully this is the solution. Come see how things turned out.

I was asked by Hyper Echo to try out their 20 volt cordless string trimmer and edger and do a review on it it. I did and in this article I will let you know what I found out.

Every fisherman has his or her own favorite techniques to catch this beloved fish. Why is crappie, (or pomoxis, if you want to get scientific), are so beloved? Well, they give one heck of a fight when caught. A 2 lb. crappie can put up a fight to rival a bass of larger size. So catching them is fun. There is also the taste factor. Fried crappie tastes great.

The weather is warm and folks are crappie fishing. Here’s a fried crappie cake recipe that I enjoy. You can eat them plain with some fried taters, or slide them in a bun with some tarter sauce.
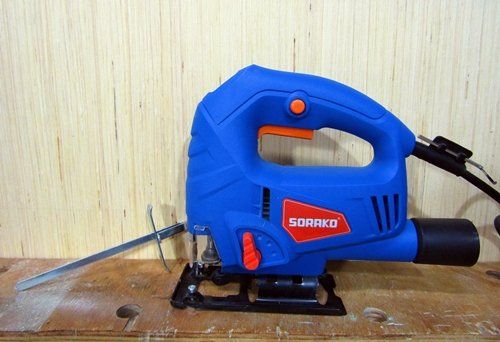
I was asked to review the .SORAKO 800-3000SPM Jigsaw And after the pleasant experience with the SORAKO chainsaw, I was happy to give their jigsaw a try. Come find out what the results were.

I was given the opportunity by HYCHIKA to try out and review their SORAKO chainsaw. This blog describes what I think about the chainsaw. How well I like it as well as my experience in using it.

I was aske to review the Hychika cordless power drill and I did. I used it to do various things in my home and in my wood shop. This is what I think of it.

Everybody seems to be in love with dovetails these days. Myself included. They look nice, feel nice, and they make the woodworker feel an overwhelming since of pride when he makes tight and even. Especially the hand cut dovetails. Dovetail joints can be produced with power tools. And there are dovetail jigs you can buy and make. It makes getting precise dovetails with no gaps a lot easier. But nothing feels more satisfying than finally getting hand cut dovetails tight and gap free. And for the record, I use the term, “gap free”, very loosely. I’d wager that even the best woodworker gets gaps in their dovetails no matter how hard they try. Maybe not as many as us new to middlin’ woodworkers, and certainly not as noticeable, but there are gaps in their dovetails. Nowadays, people use dovetails not only as a joint, but as decoration. A showpiece if you will to show off the craftsmanship of the woodworker. But the reality is that they were not originally meant to be pretty. They were utilized to hold pieces that were heavily used together. Such as drawers or other parts of furniture and other items that were constantly pulled or tugged on. In the example below, you can see how the angles of the dovetails will keep the joint from coming apart during the tugging of the drawer when opening it. This part of the joint is where the dovetail joint get’s it’s name. Often when used on boxes, the orientation of those angles are switched around, placing them on the front of the box as a decoration, and the pins of the joint is put on the side. Great for looks, not so great for function. Of course for most smaller boxes, the function of the dovetail really isn’t needed and using dovetails for looks is fine and an anesthetically pleasing way to show off craftsmanship. But let’s not give up on using the dovetail joint for utilitarian purposes when building boxes too quickly. They can be a great way to join a bottom to a box that will be holding heavier stuff, such as tool boxes. The angle of the dovetails can manage the stresses of carrying heavier items such as tools if you wish to maintain a *NO screws or nails* policy on your woodworking projects. Or you can use the dovetail joint along with screws for extra protection against the bottom dropping out. So the purpose of the dovetail is a lot more than to just make your woodworking look good. In fact, long ago, they were hidden. Simply a way to join parts and give them the strength to do what the item was meant to do, and be hidden when the drawer was closed. Using the dovetail joint for decoration is a modern thing. Which I have nothing against. I love to show off dovetails I’ve made nearly perfect. Well, in my eyes anyway. Roy Underhill and Paul Sellers would likely just look at them and grin, maybe chuckle at me being so proud of something so far from the skill level they have achieved.
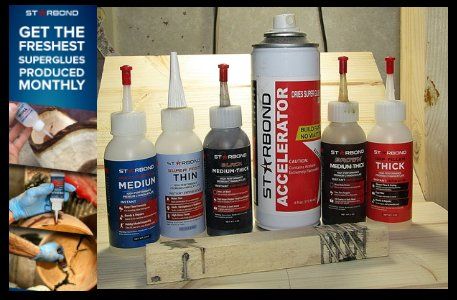
My wonderful experience with Starbond Super glue is explained in this blog post. The absolute best CA glue I've used.

An option for dealing with nail holes and voids in a table top made with pallet wood.